Car Battery Keeps Dying: 7 Fixes That Work
- Battery
Few problems are as frustrating as asking, “Why does my car battery keep dying all the time?” and getting stranded again a week later. You jump start it, maybe even replace it, and still end up with a dead battery. While batteries wear out naturally every 3 to 5 years, repeat failures almost always point to an electrical problem draining power through parasitic load, a weak alternator, or loose connections that block proper charging. If the battery has already tested good but the engine still will not crank, use the car won’t start but battery is good guide to separate starter, relay, ignition switch, and fuel or spark problems from a battery fault.
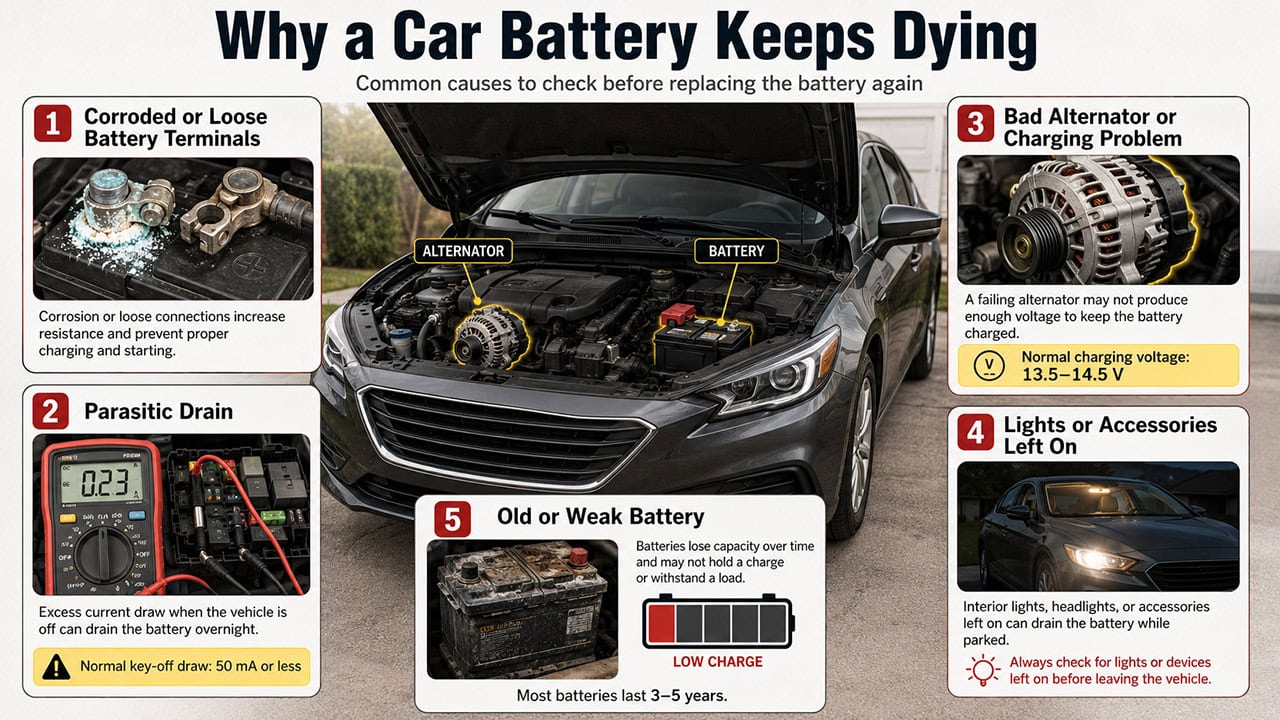
Car batteries keep dying all the time due to parasitic drain (accessories drawing power when the engine is off), a bad alternator that is not recharging the battery, extreme hot or cold weather stressing the chemistry, loose or corroded battery terminals creating electrical resistance, or an old battery reaching the end of its life with worn-out lead plates and depleted cells.
How Car Batteries Work and Fail
A car battery stores electrical energy to start your engine through the starter motor and power electrical systems when the engine is off. It converts chemical energy into electrical power through a chemical reaction between the lead plates and sulfuric acid, allowing important features like headlights, power windows, car radio, and air conditioning to work. The battery also smooths out voltage spikes in the electrical system to protect sensitive electronics like the engine control module and body control modules.
While you drive, the alternator (powered by the engine through a serpentine belt) charges the battery by converting mechanical energy into electrical current through the rotor and stator coils. The voltage regulator controls how much charge goes back to the battery, typically 13.5 to 14.5 volts measured at the battery posts.
Even when the engine is off, your car uses a small amount of power (called the key off load or quiescent current) for things like the clock, security alarm system, engine computer memory, and keyless entry system. This normal power draw should be 50 milliamps (mA) or less measured at the battery cables. If something draws more energy than it should overnight, a condition known as parasitic drain or phantom drain, the battery will discharge and die from excessive current draw.
When a battery dies repeatedly, test four things in order: battery condition, cable connections, key-off current draw, and charging voltage. That sequence separates a worn-out battery from a vehicle fault that will drain or undercharge any new battery you install.
Common Causes of Repeated Battery Death
1. Corroded or Loose Battery Connections
Corroded or loose battery terminals are one of the most common reasons batteries seem to die repeatedly. The battery has two terminals (posts) on top or on the side, a positive terminal (marked with + and usually red) and a negative terminal (marked with minus and usually black). Heavy battery cables connect to these posts with metal clamps that bolt tight around the terminals using terminal bolts.
When corrosion builds up on the terminal posts or cable clamps, it creates a layer of crusty material (white, blue, or greenish powder) that blocks the flow of electricity through the connection. This corrosion is caused by battery acid fumes (hydrogen gas) reacting with the metal terminals. Even a little corrosion increases electrical resistance, which means the alternator cannot charge the battery properly through the positive cable and the starter motor does not get enough power to crank the engine through the negative ground cable.
Loose battery cable connections cause similar problems affecting the electrical system. If the cable clamps are not tightened down firmly on the battery posts, there is a poor connection with high resistance. The cables can vibrate loose over time from engine vibration and road bumps. A loose connection means electricity cannot flow consistently from the alternator to charge the battery or from the battery to power your starter motor through the battery cables.
2. Parasitic Electrical Drain
Parasitic drain (also called phantom drain, key off drain, or battery draw) happens when electrical components keep drawing power from your car battery even after you turn off the ignition and remove the key. Every car has some normal parasitic drain, your clock, radio memory, alarm system, and engine computer all need a tiny bit of power to remember their settings. This normal drain should be 50 milliamps (0.050 amps) or less measured with a multimeter.
Problems start when something draws much more power than it should through excessive current draw. Common causes include interior dome lights that do not turn off completely, trunk lights with bad door switches, glove box lights staying on, aftermarket stereo systems or amplifiers with bad wiring, faulty door switch sensors, stuck relays in the fuse box, malfunctioning body control modules, or charging ports (USB ports or 12V outlets) that stay powered constantly even with the ignition off. If the symptom is more like a sudden stall and then a restart later, treat it as an intermittent power or engine-control fault and compare it with the patterns in car stalls while driving but starts back up.
3. Lights or Accessories Left On
One of the simplest reasons for a dead battery is accidentally leaving lights or accessories on when you park the car. Headlights are the biggest battery drainer, they draw 10 to 15 amps of current, which means they can kill a battery in just 2 to 4 hours. Interior dome lights, map reading lights, and trunk lights also drain the battery quickly if left on overnight. Even smaller lights like under hood work lights or vanity mirror lights can drain enough power to prevent starting the engine the next morning.
Modern cars have warning systems to help prevent this problem. Many vehicles beep or chime when you open the door with the headlights still on. Some cars automatically shut off interior lights after a set time period (usually 10 to 30 minutes). However, these safety features do not always work, door switches can fail, automatic shutoff timers can malfunction, or you might not hear the warning chime from the instrument cluster.
Other accessories that kill batteries include leaving the key in the accessory position (which powers the radio and dashboard instruments without running the engine), playing the car stereo for hours without the engine running, using power inverters or phone chargers when parked, running cooling fans or heated seats with the engine off, or leaving power windows, sunroofs, or power mirrors activated without the ignition on.
Early Warning Signs
Slow Engine Cranking
Slow cranking means the engine turns over sluggishly when you turn the key or push the start button, you hear a slow rrrr rrrr rrrr sound instead of the normal quick rrrrrrrr cranking. This is one of the first signs that your battery is getting weak or dying. The starter motor needs a lot of electrical current (200 to 400 cold cranking amps) to spin the engine fast enough to start it. When the battery is low on charge, it cannot deliver enough amperage to the starter motor to crank the engine properly.
Several things cause slow cranking. A weak battery that has lost its ability to hold a full charge is the most common cause. Corroded battery terminals create electrical resistance that reduces the current flow to the starter motor. A failing alternator that is not fully recharging the battery while you drive leaves the battery partially discharged. Bad connections at the battery cables, starter motor solenoid, or ground straps to the engine block also restrict current flow through the electrical system.
If you notice slow cranking, get the battery load tested. That test shows whether the battery is weak or whether you should keep looking at cables, grounds, the starter circuit, or charging voltage. If the slow crank becomes a no-crank condition with one solid click, follow the car clicks once but won’t start checks before replacing the battery again.
Dim or Flickering Headlights
Dim headlights are a clear warning sign of battery or charging system problems. When the battery voltage drops below normal (12.6 volts when fully charged), there is not enough electrical power to run all the lights at full brightness. You will notice the headlights look yellowish or weak instead of bright white, especially when the engine is idling or when you are stopped at a traffic light.
Pay attention to when the headlights dim. If they are dim when the engine is off but get brighter when you start the engine, the battery is weak but the alternator is probably working. If the lights stay dim even with the engine running, you likely have a failing alternator that is not producing enough voltage to power the electrical system. If headlights get dimmer when you turn on other accessories (like the heater blower motor or rear defroster), the battery cannot handle the electrical load from multiple accessories at once.
Flickering headlights, lights that pulse bright and dim rhythmically, usually point toward unstable charging voltage. Check battery terminals first, then test alternator output if the lights still flicker.
Electrical System Problems
Random electrical glitches often signal battery or charging system trouble. Watch for dashboard warning lights that come on and off randomly (like the check engine light, ABS light, or airbag light), the car radio losing its station presets and clock settings, power windows moving slower than normal, the dashboard gauges acting erratically (needles jumping or dropping), or error messages appearing on the instrument cluster about electrical system faults from low voltage.
Modern cars rely on many electronic control units (ECUs), control modules, and computers to run everything from the engine to the power seats. These sensitive electronics need stable voltage (between 12 to 14.5 volts) to work properly. When battery voltage fluctuates due to a weak battery or failing alternator, these modules malfunction or reset themselves. That is why you might lose your radio presets or see warning lights when the battery is dying.
Starter problems are another electrical clue. A single solid click, grinding, or silence points you toward the starter circuit instead of the battery alone. For rapid clicking, compare the sound against what I check when a car is clicking when trying to start, because repeated clicks usually point to voltage collapse rather than a seized starter.
Swollen or Bloated Battery Case
A swollen or bloated battery is a serious warning sign that should not be ignored. The battery case is normally rectangular with flat sides and top. If the sides bulge outward, the top looks rounded or puffy, or the whole battery looks bigger than normal, that is swelling. This physical deformation means something is very wrong inside the battery cells.
Overcharging is the most common cause of battery swelling. When a faulty voltage regulator or bad alternator pumps too much voltage into the battery (above 14.8 volts continuously), it overcharges the battery. This causes excessive heat and makes the electrolyte solution boil inside the battery cells. The boiling creates hydrogen gas and oxygen gas faster than it can escape through the vent caps. Pressure builds up inside the sealed battery case, causing it to expand and swell.
Safety Warning
A swollen battery is dangerous and needs immediate replacement. The swelling can crack the battery case, causing sulfuric acid leaks that corrode nearby parts and burn your skin. Overcharged batteries produce explosive hydrogen gas that could ignite from a spark. Never try to charge or jump-start a visibly swollen battery. Replace it immediately and have a mechanic test your alternator and voltage regulator to prevent the new battery from swelling too.
Professional Testing and Maintenance
Accurate battery diagnosis combines visual inspection, voltage testing with a multimeter, and load testing to assess overall battery health and charging system performance. Many auto parts stores (AutoZone, O Reilly Auto Parts, Advance Auto Parts) offer free battery testing using professional grade equipment like battery analyzers. They will test your battery state of charge, cold cranking amps (CCA rating), internal resistance, and alternator output voltage to determine if your battery needs replacement or if you have charging system issues.
Professional battery testing uses specialized tools that DIY multimeters cannot match. Carbon pile load testers apply a heavy electrical load (half the battery CCA rating) for 15 seconds while measuring voltage drop, this simulates actual starting conditions. Conductance testers send electronic pulses through the battery to measure internal resistance and predict remaining battery life. These professional tests reveal battery condition more accurately than simple voltage checks, identifying weak cells or sulfation damage on the lead plates that voltage testing might miss.
Testing Battery Voltage with a Multimeter
A multimeter (also called a volt meter or voltage tester) is an inexpensive tool that measures electrical voltage, current, and resistance. To test your car battery voltage, you need a digital multimeter set to the DC voltage setting (usually marked as V with a straight line and dashed line). Most multimeters have a dial or button to select the 20 volt DC range.
To measure battery voltage correctly: Turn off the engine and all accessories (lights, radio, etc.). Connect the multimeter red positive probe to the positive battery terminal (marked + and usually red). Connect the black negative probe to the negative battery terminal (marked with minus and usually black). The meter will display the battery resting voltage, also called open circuit voltage.
A healthy, fully charged battery reads 12.6 to 12.8 volts when the engine is off. If your battery reads 12.4 volts, it is about 75% charged. At 12.2 volts, it is 50% charged. Anything below 12.0 volts means the battery is nearly dead and probably will not start your car. Below 11.8 volts indicates a completely discharged battery or a bad battery cell.
Next, test the charging system with the multimeter. Start the engine and let it idle. The voltage should jump up to 13.5 to 14.5 volts with the engine running, showing that the alternator is charging the battery. If the voltage stays at 12.6 volts or drops when you start the engine, the alternator is not working. If voltage goes above 15 volts, the voltage regulator is faulty and is overcharging the battery through excessive voltage output.
Testing for Parasitic Drain (Current Draw Test)
Testing for parasitic drain requires measuring how much electrical current flows from the battery when everything should be off. You’ll need a digital multimeter that can measure DC amps (current). This test tells you exactly how many milliamps your car draws when parked, helping identify battery drains that kill batteries overnight or over a few days. Use the parasitic draw battery drain calculator to estimate how long a draw will take to drain your battery.
Here’s how to test parasitic drain: First, make sure everything is off-doors closed, trunk closed, hood open slightly (use a folded towel to trick the hood switch so it thinks the hood is closed), key out of ignition, and no accessories running. Disconnect the negative battery cable from the battery terminal. Set your multimeter to measure DC amps (usually 10-amp or 20-amp setting). Connect the multimeter in series between the negative battery cable and the negative battery terminal-one probe touches the cable, the other touches the battery post.
Wait 15-20 minutes for all computers and modules to go to “sleep mode.” The amp reading will drop as systems shut down. A normal parasitic draw is 50 milliamps (0.050 amps) or less. Draws of 100-200 milliamps will kill your battery in 2-3 days. Anything over 500 milliamps will drain the battery in hours. If your draw is too high, you need to find which circuit is causing the drain.
To locate the problem circuit, pull fuses one at a time from the fuse box while watching the multimeter. When you pull a fuse and the amp reading drops significantly (by 100+ milliamps), you’ve found the problem circuit. Check the fuse box diagram to see what components are on that fuse-it might be interior lights, radio, power seats, or an electronic module. You can also check individual relays in the relay box by pulling them one at a time.
Common parasitic drain culprits include aftermarket stereos or amplifiers with bad wiring, stuck relays in the fuse panel, glove box or trunk lights staying on, faulty door jamb switches, bad power window or seat modules, malfunctioning alarm systems, or corroded wiring harness connections that create short circuits. Finding and fixing parasitic drains can be complex, so consider taking your car to a qualified auto electrician if you can’t locate the problem.
Cleaning and Maintaining Battery Connections
Keeping battery terminals clean and tight is one of the easiest ways to prevent battery problems. Corroded or loose connections cause more battery issues than bad batteries themselves. Check your battery terminals every month or two, especially if you notice any starting problems or dimming lights.
To clean corroded battery terminals: First, wear safety glasses and gloves to protect from battery acid. Disconnect the negative cable first (to prevent sparks), then disconnect the positive cable. Mix one tablespoon of baking soda with one cup of water to make a cleaning solution. Pour or brush this mixture onto the corroded areas of the battery posts and cable clamps-it will fizz and bubble as it neutralizes the acid. Scrub the terminals and cable clamps with a wire brush or battery terminal brush (a special brush with stiff bristles that clean both the inside of cable clamps and the outside of battery posts).
Rinse everything thoroughly with clean water to wash away all the baking soda and corrosion residue. Dry the battery terminals and cables with a clean rag. Apply a thin layer of dielectric grease, battery terminal protector spray, or petroleum jelly to the clean terminals before reconnecting. Reconnect the positive cable first, then the negative cable. Tighten the cable clamps firmly using a wrench-they shouldn’t wiggle or move at all when you try to twist them.
Inspect battery cables for damage while cleaning terminals. Look for frayed wires, cracked insulation, green or white corrosion inside the cable ends, or cables that feel stiff instead of flexible. Bad battery cables have high electrical resistance that prevents proper charging and starting. Replace damaged cables immediately-they’re inexpensive and easy to install. Also check the battery hold-down bracket or clamp that secures the battery in the tray. A loose battery bounces around while driving, damaging internal battery plates and loosening cable connections.
Weather and Charging System Issues
How Extreme Weather Kills Batteries
Temperature extremes are major battery killers. Both hot and cold weather damage batteries in different ways, shortening their lifespan and causing sudden failures. Understanding how weather affects batteries helps you prevent problems and know when to replace an aging battery before it dies completely.
Hot Weather Damage: High summer temperatures (above 90 degrees F) are actually harder on batteries than cold weather, even though cold gets more attention. Heat speeds up the chemical reactions inside the battery cells, causing the battery to work harder and age faster. This accelerated chemical activity causes the electrolyte solution (distilled water and sulfuric acid) to evaporate through the vent caps, lowering the fluid level. When the lead plates inside the battery are not fully covered by electrolyte solution, they get damaged and corrode.
Extreme heat also causes sulfation, lead sulfate crystals build up on the battery plates, reducing the battery ability to hold a charge. Under hood temperatures can reach 200 degrees F or higher when parked in direct sunlight, cooking the battery and shortening its life by months or even years. The plastic battery case softens in extreme heat, sometimes cracking or warping. Heat damage is cumulative, a battery that survives several hot summers will fail much sooner than one kept in moderate climates.
Cold Weather Problems: While cold does not damage batteries like heat does, it drastically reduces their available power. At 32 degrees F (freezing), a battery loses about 35% of its cranking power. At 0 degrees F, it loses 60% of its strength. Meanwhile, cold engine oil becomes thick like molasses, making the engine much harder to crank. Your battery has to work twice as hard when it has half its normal power, that is why weak batteries die on the first cold morning of winter.
A fully charged battery will not freeze until temperatures drop below minus 70 degrees F. But a discharged battery (below 12.0 volts) can freeze at just 20 degrees F. When battery electrolyte freezes, it expands and cracks the battery case and warps the internal lead plates, permanently destroying the battery. Temperature swings (warm days and freezing nights) also stress battery components through repeated expansion and contraction cycles.
Extreme weather increases electrical loads too. Air conditioning systems in summer heat draw heavy current from the battery and alternator. In winter, heaters, defrosters, heated seats, and headlights (used more during long dark nights) all demand extra power from an already weakened battery.
Recognizing a Failing Alternator
When the alternator, voltage regulator, belt, or alternator wiring fails, the battery never gets fully recharged while you drive.
Watch for these common alternator failure symptoms: The battery warning light (red battery icon or ALT or GEN light) on the dashboard stays on while driving, indicating charging system problems. The battery keeps dying even though you just replaced it, or the car dies while driving because the alternator stopped supplying power and the battery drained.
Listen for unusual noises from the alternator area. A whining or grinding noise that speeds up with engine RPM suggests bad alternator bearings. A squealing sound when you start the car or accelerate means the serpentine belt is loose, glazed, or worn and is slipping on the alternator pulley. Smell for burning rubber (overheated belt) or electrical burning smells (fried alternator wires or diodes).
Use the voltage readings from your multimeter test to judge alternator output. For a more complete charging check, enter resting voltage, loaded voltage, ripple, and cable drop readings into the charging system voltage drop checker.
Common alternator failures include worn-out bearings, bad voltage regulator, burned diodes (causing low or fluctuating output), broken serpentine belt, loose or corroded wiring connections to the alternator, or a seized alternator pulley.
Repair Costs and Professional Service
Typical Repair Costs
-
Battery terminal cleaning: $20-50 at a shop, DIY with $5 wire brush
-
New battery replacement: $80-200 for standard flooded battery, $150-300 for AGM
-
Alternator replacement: $350-800 including parts and labor
-
Starter motor replacement: $300-600 depending on vehicle
-
Parasitic drain diagnosis: $100-200 for professional testing
-
Serpentine belt replacement: $75-200 including tensioner check
Prevention Strategies
Proper Battery Maintenance Routine
Regular battery maintenance is your best defense against repeated battery failures. Set up a monthly inspection routine: visually check the battery case for cracks, bulging, or leaks; inspect the battery hold-down clamp to ensure the battery isn’t loose in the battery tray; examine both battery terminals and cable ends for white, blue, or green corrosion buildup; and look for frayed insulation or exposed copper wire on the battery cables.
For cars that sit unused for extended periods (like classic cars, RVs, or seasonal vehicles), invest in a battery maintainer (also called a trickle charger or smart charger). These devices connect to your battery and automatically charge when voltage drops, then switch to float mode to prevent overcharging. Quality maintainers cost $30-50 and can extend battery life by years. They’re especially important in extreme heat or cold, where batteries self-discharge faster when parked.
Why Short Trips Kill Batteries
Frequent short trips (under 20 minutes) are hard on batteries and one of the hidden causes of repeated battery death. When you start your car, the starter motor draws a huge burst of current (200 to 400 amps) from the battery for just a few seconds. This big power draw depletes some of the battery charge. The alternator needs time to put that energy back into the battery and fully recharge it.
Most alternators need at least 20 to 30 minutes of driving to fully replenish the energy used during starting. Short trips to the grocery store (5 to 10 minutes), dropping kids at school, or quick errands do not give the alternator enough running time to fully recharge the battery. Each trip drains the battery a little more, and it never gets fully charged back up. Over days and weeks, this gradual discharge weakens the battery until it cannot start the car anymore.
The problem gets worse in cold weather (battery has less power) or when you use electrical accessories during short trips. Running the heater, headlights, wipers, and radio during a 10-minute drive adds to the electrical load, making the deficit even worse. The battery loses more power than the alternator can replace.
Preventing Short Trip Battery Drain
To prevent battery drain from short trips: Combine errands into one longer trip instead of multiple short ones. Try to take a 20-30 minute drive at highway speeds once a week to let the alternator fully charge the battery. Consider walking, biking, or using other transportation for very short trips. If you mostly do short trips, use a battery maintainer (trickle charger) to keep the battery topped off when the car sits overnight. Turn off unnecessary electrical accessories (heated seats, rear defroster, radio) on short trips to reduce the electrical load on the battery.
Upgrading to a Premium or AGM Battery
Not all car batteries are created equal. Battery technology has advanced significantly beyond basic flooded lead acid designs. While economy grade batteries cost $80 to $120, premium batteries ($150 to $300) offer significantly better performance, longer lifespan (4 to 7 years vs. 3 to 5 years), and greater resistance to the conditions that kill cheap batteries. If you have had repeated battery failures, live in extreme climates (hot deserts or cold winters), or drive a vehicle with high electrical demands, upgrading to a premium battery is a smart investment.
Premium batteries come in several types based on internal construction: Enhanced Flooded Batteries (EFB) use thicker lead plates, stronger separators, and better grid design than standard flooded batteries, lasting 1 to 2 years longer with better deep cycle tolerance. Absorbent Glass Mat (AGM) batteries are the premium choice, they use special fiberglass mat separators saturated with electrolyte instead of free flowing liquid acid. This makes AGM batteries completely sealed, spill proof, vibration resistant, and much more durable than flooded designs.
AGM batteries excel in demanding conditions and applications. They perform better in temperature extremes, maintaining higher capacity in freezing weather and resisting heat damage in hot climates. AGM technology is ideal for modern vehicles with high electrical loads: cars with navigation systems, premium sound systems with multiple amplifiers, aftermarket electronics (dash cams, GPS trackers), heated and cooled seats, or diesel engines (which require more starting power). Vehicles with start stop technology (automatic engine shut off at stoplights to save fuel) need AGM batteries because they handle the thousands of engine starts per year that would quickly kill a standard flooded battery.
Premium batteries feature higher specifications for critical performance metrics. Cold Cranking Amps (CCA) measures how much current the battery can deliver for 30 seconds at 0 degrees F (freezing) while maintaining at least 7.2 volts, higher CCA means better starting power in cold weather. Reserve Capacity (RC) measures how many minutes the battery can power essential vehicle systems (ignition, fuel pump, lights) at 25 amps if the alternator fails, higher RC gives you more time to drive to safety. Battery Group Size (like Group 24, Group 35, Group 48) indicates the physical dimensions and terminal layout, which must match your vehicle battery tray. Use the CCA requirement estimator to sanity-check starting power, then use the battery group size finder to confirm fit.
When shopping for a replacement battery, match or exceed your original equipment (OE) specifications. Check your owner’s manual or the label on your current battery for the required CCA rating, group size, and terminal configuration (top post vs. side post). Never downgrade to a battery with lower CCA than specified-it won’t have enough power to start your engine in cold weather. Consider upgrading CCA by 10-20% if you live in extremely cold climates or have added electrical accessories.
Consider a premium AGM battery if: you live in desert heat (Arizona, Nevada, Texas) or harsh winters (Minnesota, Montana, Alaska); you primarily make short trips under 15 minutes; your vehicle has extensive electronics, aftermarket stereo, or off-road accessories; you’ve experienced multiple battery failures in 2-3 years; or you want the longest possible battery life and best cold-weather performance. The higher upfront cost ($70-150 more) pays for itself through 2-3 years of additional service life, superior reliability, and avoiding the hassle and expense of roadside assistance calls.
Conclusion: Solving Repeated Battery Failures
A replacement battery should be the last step, not the first. Find where the charge is being lost, then fix that fault before installing another battery.